by Craig C. Ramsey, CyberOptics Semiconductor Inc.
Executive overview
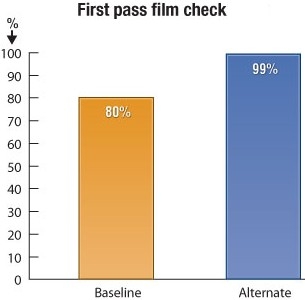
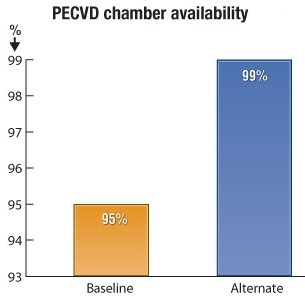
Legacy gapping methods used by engineers to measure the gap between a plasma-enhanced chemical vapor deposition (PECVD) heater and gas showerhead contribute to reduced film checks and chamber availability. This article contrasts a legacy chamber gap-measurement method used by engineers that employs crush blocks, a wired leveling device and digital calipers with an automated method that uses a wireless gapping device with three non-contact distance sensors and a standard NIST traceable gap. The thin-film group at a 300mm fab introduced the automated gapping method and improved first pass film checks by 24% and chamber availability by 4%.
July 2, 2010 – The thin-film group at a 300mm fab wanted to establish a more precise and repeatable process to measure the gap between a PECVD heater and gas showerhead after the chamber failed first-pass film checks 20% of the time using a time-consuming legacy method. Each time the chamber failed a film check, the team lost 6hrs of chamber production time to re-gap the chamber, while increasing maintenance cycle time and expenses.
Legacy gap-measurement method
Engineers in the thin-film group obtained chamber gap measurements using a legacy method that employs crush blocks, a digital caliper and wired leveling systems.
Each tool used by engineers in the legacy gapping process was susceptible to instrument and operator variances and delivering imprecise gap measurements: the crush blocks compressed when the chamber closed, compressed further when the chamber pumped and could be crushed all together during caliper measurement. The blocks contacted small areas of the heaters and showerheads, and engineers could place them on a hill or in a valley or disturb them when taking measurements. The digital caliper had reproducibility issues, while the wired leveling systems placed inside the chamber were not as accurate as the crush blocks, often broke after being routed through the chamber’s seal, and sometimes deflected the lid.
The thin-film group’s engineers followed a multi-step process to measure and set the PECVD gaps using the legacy gapping method: They cooled the chamber for four hours before venting it and removing kits. They cleaned the chamber, installed kits and placed wired leveling systems on both heaters. They pumped the chamber down, adjusted each heater’s orientation and offset and vented the chamber. They placed crush blocks on both heaters and pumped the chamber down before venting it and measuring the crush block lengths.
The engineers often repeated the legacy gapping process multiple times — beginning with placing the wired leveling systems on both heaters — until the chamber came within the gap tolerances required to deposit quality films. They then closed, pumped, and heated the chamber for an hour before processing film-check wafers and measuring average thickness and uniformity to ensure that films were within specification. They repeated the process until the chamber passed.
A PECVD chamber fails first pass film check for a variety reasons: When film is too thick or thin, it may be due to an incorrect average gap or level of temperature, pressure, gas-flow rate or plasma. Similarly, when film isn’t uniform, it may be due to a non-uniform gap, temperature, gas-flow rate, or plasma.
When films failed the parametric check, the legacy gapping process was repeated and six hours of chamber production time were lost. The results engineers obtained using the legacy method also didn’t give them the reproducible data to establish a repeatable process and controls for both techs and equipment.
Automated gap-measurement method
Engineers in the thin-film group obtained automated chamber gap measurements with a wireless, wafer-like device and a standard NIST traceable gap. The 300mm form factor device with three non-contact distance sensors returned real-time gap measurements to a laptop or PC in numerical and graphical form. Engineers used the device to ensure gaps that were accurate and precise enough to allow for film at the proper thickness and for data logging to set statistical standards. The vacuum-compatible device also minimized the possibility of chamber contamination and shortened the total tool maintenance cycle.
The thin-film group’s engineers followed the required cooling and heating steps to measure and set the PECVD gap using the automated gapping method. The method called for engineers to only vent the tool once after changing a kit, and they captured and set gap measurements in ~2min rather than ~1hr. They cooled the chamber for 4hrs before venting it and removing kits. They cleaned the chamber, installed kits and calibrated two of the device’s wireless gap sensors using the NIST traceable gap. Engineers placed the sensors on heaters A and B in the chamber, pumped the chamber down and adjusted each heater’s orientation and offset in real time under vacuum. They vented the chamber and removed the sensors before closing, pumping, and heating the chamber for 1hr. They then processed film-check wafers and measured average thickness and uniformity to ensure that films were within specification. The gapping process was rarely repeated given the high rate of first-pass film checks.
Conclusion
There is often a direct relationship between PECVD chambers failing first-pass film checks and the accuracy and repeatability of the gapping method used to measure and set the gap between a heater and gas showerhead. Chambers fail first pass film check when average thickness and uniformity exceed tight tolerances. A thin-film group increased first pass yield of film check 24%, to over 99%, and chamber availability by four percent in migrating from a legacy gapping method to a wireless, automated method using a wafer-like sensor and standard NIST traceable gap.
 |
 |
Left: Migration from a legacy chamber gap-measurement method to an automated method
improved first pass film check by 24%. Right: An automated chamber gap-measurement
method increased chamber availability 4% over a legacy gapping method.
The automated method followed the required cooling and heating steps, while reducing gap-measurement time from ~1hr to ~2min. Engineers didn’t modify film criteria, and they maintained film quality. The group improved gapping accuracy and repeatability to improve maintenance cycle time and reduce total operating expenses, including labor, materials and instrument maintenance. They set performance standards based on preventive maintenance (PM) data collection and were able to optimize their PM schedules and implement process controls. An automated wafer processing metrology sensor ultimately helped the thin-film group control PECVD chamber gap uniformity and magnitude with high stability over time.
Craig C. Ramsey received his BS in chemistry from Purdue U. and his MS and PhD in bio-physics from The Ohio State U. and is the general manager of CyberOptics Semiconductor Inc., 9130 SW Pioneer Court, Suite D, Wilsonville, OR 97070 USA; ph.: (503) 495-2200; [email protected].

